Must have done something right, the car deities were smiling upon me today. Much thanks go out to Troy who called me in the morning with the news that a fellow Toyotaite, Malcom, called him to tell him that there was a FX16 at ABC Used Auto Parts. A chance like this wasn’t about to happen here on this island again, so I got on the horn and recruited Jay to ride shotgun. Picked him up after lunch and headed out to Pearl City. Darn hot, but that’s better than a spoogefest. Jay spotted it first, tucked behind a few cars, but sitting in a nice clearing.
Archive for the 'car' Category
Page 38 of 39
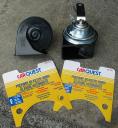
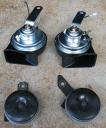
After the incident with the FX-16, and after myself almost getting smacked, rammed, cut off, or otherwise negatively affected by people that dont know how to drive, I’ve finally decided to change out my little stock “Meep Meep” horns with something bigger. Meet the Freeway Blaster, by Fiamm.
These bad boys are rated at 130+dB, a good bit over the stock horns which are stamped 113dB. As you can see theres a pretty significant size difference too.
After cramming them in, I’m pretty satisified with the result!
This past Saturday was chop day. Derek came by with his demolition saw. Tools of destruction are always fun. Anyway, to start cut the welds for the door skin with cute little Dremel. Derek’s got some skills, he was able to cut the two welds without that self-destructo cutting wheel exploding. That didn’t happen until after when I attempted a cut into the plastic door handle, whereupon it promptly shattered in two sending a piece flying into another dimension somewhere. The same place all spring clips go. That done it was time to graduate to the more serious tool.
Everyone’s favorite, the demolition saw. People call it sawzall, but that’s actually a tradename, like scotch tape. Continue reading ‘Cut! Cut! Cut!’
Well that didn’t work. Tried to get the door off. Started with this:
Drilled a bunch o holes for the slide hammer dent puller. Have I mentioned for some odd reason I get a sense of satisfaction from this tool. I like using it.
Silly me didn’t take a pic of the actual hammer. Anyway, results were marginal and slow.
Not being very concerned with preserving the door, at least not the top part, things got down to yanking on it like a crazed monkey.
Which actually was fairly effective. Maybe body shops should keep a crew of chimps on hand. But if you didn’t give them all cake they’d go ape sh*t and gnaw on your genitals. That tends to make for bad crew morale, although if you watch any of those kustom car building shows, you gotta wonder. Anyway, this is how the door stands now.
In case you’re wondering, my objective here was to remove the door so I could install my old rusty crusty door. So what I was hoping was that by somewhat straightening the door & accessing the linkages, I could unlock & unlatch the door. No such luck. Although I was able to get things straight enough that the linkages moved, the latch itself is too messed up & out of alignment to open. I even resorted to climbing inside & kicking at the door from inside. Kind of eye opening that with damage of only this extent you can’t easily force a car door open. So it looks like it’s time to call in the big guns and bring in the boys with the demolition saws. I think we’re going to have to cut the door apart. I thought of attempting to unbolt the door hinges, but you need to remove the fender to access the bolts. And in order to remove the fender, you need to open the door to access one of those bolts. Besides, chopping the door up should be good for some entertainment value, and I think Dr. D hasn’t busted out the demo saw in a while.
I’m feeling sad right now. Poor little FX got smushed today. After finishing a job call, was waiting to pull out of Y Hata onto Sand Island Access Road. Big o Dodge Ram 2500 sitting to right of me on shoulder behind the cars that park along road fronting the Y Hata wall. Wondering what the heck he’s doing, is he waiting to pull into traffic? He’s not doing anything or signaling, so I finally pull forward to get ready to pull into traffic. Then he decides to back up. I lean on my pathetic little single stock horn as I watch the tailgate looming through the side window, get dark from the shadow cast, then the sickening crunch and the sudden whiteness as the safety glass crumbles into those little jewely cubes.
With 20/20 hindsight, I suppose I could have backed up, but I didn’t know if it was clear behind me and I know I didn’t want to go forward since I was sitting there because I was waiting for a hole in traffic. So all I could manage was to lean on horn and watch like a deer caught in the headlights.
I’m not sure what’s going to happen now. Got initial estimate from body shop. Verdict was its non repairable as they can’t get the part. I’m taking in my original FX door tomorrow, but pulling it off just a while ago, found it’s badly rusted.
Well, no surprise the FX has no A/C. Both the original & new one at one time did. The new one was striped of it & p/s, but in order to get p/s into the new one, I had to mount the compressor even though I have to suffer with no A/C. I found the bracket & pulley I needed on ebay to replace this, and amazingly got a really good price on it. From Toyota parts I was looking at something like $300. I got it for basically the cost of a work weeks worth of plate lunches.
So here we have the compressor sitting in here acting as a big heavy idler.
Here’s the original bracket & compressor being removed and the new bracket & pulley that is replacing it.
Scale is kinda off, but this should save a good amount of weight & clean things up a bit. Here’s the arrangement now.
When will it end? Well, here’s the ECU without the glob of goo.
And everything in engine bay is back together! I’ve also swapped out throttle cable as the hack one was short and the cable stop mounting was also hacked to accomodate. I’m not sure why they did this.
And so, finally the moment of truth arrives:truth.avi
After this I take care of some other issues like figuring where to hook the tach, the speed sensor, check engine light. Man does this feel good!
Thanks to Aaron who is also working on a 20v install in his MK1 MR2, I got that missing connector with perfect timing. The harness is done!
For some reason it seems this connector is often missing from salvaged harnesses. So it was being held on with RTV gooped over it on mine.
Anyway, got the harness snaked into the engine bay & through the firewall. Started plugging things in. So close, but I’m calling it a night. Stay tuned to see if it works!
Okay, resumed working on the FX wiring. I’m now the electrical taping monkey. Taping up the loom, gone through 1 and half rolls of tape already. I sure hope this all works! Ended up being a little more work because the JDM 20v harness is setup for right hand drive, so the harness goes through on the left side of the firewall. My US setup is opposite, so had to reroute wires and splice in extensions. Getting close to the moment of truth!
I can just see Scat shaking his head. He would advise me to jus’ carb ’em! With the harness completely out, I can see a certain esthetic appeal as the bay looks nice & clean without all the wires. Doesn’t help that the previous conversion job was a pretty haphazard hack job with stray wires all over the place. I spent all day Saturday on this. Not sure if you can see, but there’s less wires, one of the ECU connectors has been completed, the two looms are migrating together almost ready to merge. Would have been interesting to have done time lapse pics. It should look a lot cleaner when done. And if I convert over to the MegaSquirt standalone ECU, I can make it look all hotrod stylie with exposed shiny individual velocity stacks on each cylinder intake. Maybe put in a functional hood scoop to feed them! Bwop!


